Check Rooms
Overview
Check Rooms opens a modeless, editable grid of every room in the model — Number, Name, Base Level, Base Offset, Top Level, Top Offset, Area, and Status (Placed / Unplaced / Redundant). Filter by level, scope to the entire model or just the active view, edit values inline (Number, Name, offsets, Top Level), delete selected rooms, and highlight any room in the model. Because the panel is modeless, each Apply commits immediately and permanently — every edit its own Ctrl+Z entry — so you can keep working in Revit and click Reload to refresh the grid.
How to use
- In the B45 Labs | Coordination tab, open the QA/QC panel and click Check Rooms.
- Review every room in the grid; use the Level filter and the Entire Model / Active View scope to narrow what's listed.
- Edit Number, Name, Base/Top Offset, or Top Level inline, and use Select All / Deselect All plus Delete Selected to clear redundant or unplaced rooms.
- Click Apply to write the edits and deletions to the model — changes commit immediately (undo them one at a time with Ctrl+Z in Revit).
- Click Highlight to select a room and zoom to it in the active view.
- Keep editing on the Revit canvas if you need to, then click Reload to re-read the rooms from the current model state.
Screenshots
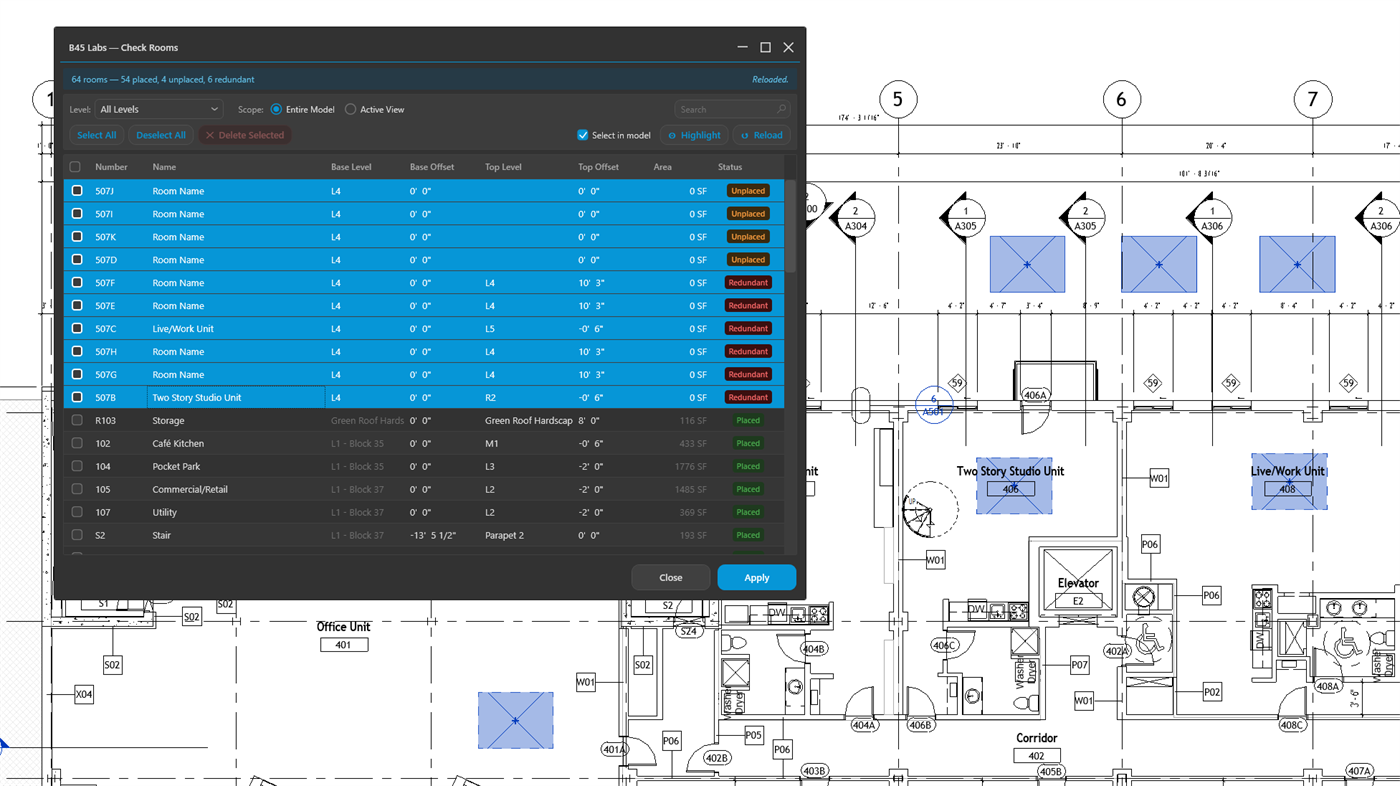
Check Rooms with status badges showing Placed, Unplaced, and Redundant rooms
Tips & Notes
- Redundant rooms with zero area are enclosure or placement errors — sort by Status, select them, and Delete Selected.
- The Status column is your triage: Placed is healthy, Unplaced needs manual placement, and Redundant should usually be deleted.
- Because the panel is modeless there is no OK/Cancel rollback — Apply is permanent, so review your selection before deleting.
- Pair it with Check Walls: a wall that isn't Room Bounding is a common cause of a room reading zero area.
Limitations
- Operates on rooms in the host model only, not in linked models.
- Does not create rooms or place Unplaced rooms — placement needs manual interaction on the canvas.
- No session Cancel — each Apply is committed immediately (undo via Ctrl+Z in Revit).