Check Levels
Overview
Check Levels opens every level in the model in an editable, two-tab window. On the Main Model tab you review and edit level names and elevations in a grid, add new levels at a configurable offset, duplicate or delete selected levels, and search — duplicate names and duplicate elevations are flagged live. On the Link Comparison tab you pick a loaded Revit link and see its levels matched to the host's by name, with a per-row status (Match, Elevation Diff, Host Only, Link Only), the elevation delta, and whether each link level is under Copy/Monitor. Edits are staged in a session and written on Apply; Reset or Cancel rolls the whole session back.
Main Model tab
- Editable grid of every level — Name and Elevation, in the project's units.
- Add Level, Duplicate, and Delete Selected, with a New level offset field that decides where a new level lands: above the highest level, or below the lowest one when the offset is negative.
- Live flags for duplicate names and duplicate elevations, plus a search box.
- Apply writes staged edits, adds, and deletes; Reset rolls the session back; OK commits; Cancel discards.
Link Comparison tab (read-only)
- Pick a loaded Revit link and compare its levels to the host, matched by name.
- Per-row status — Match, Elevation Diff, Host Only, or Link Only — with the elevation delta.
- A Monitored badge shows which link levels are under Copy/Monitor.
How to use
- In the B45 Labs | Coordination tab, open the QA/QC panel and click Check Levels.
- On the Main Model tab, review the grid — Name and Elevation are editable, and rows with a duplicate name or duplicate elevation are flagged.
- Edit names and elevations inline, or use Add Level, Duplicate, and Delete Selected to change the level set. The New level offset field sets how far a new level lands from the stack, and a negative value extends the stack downward instead of upward.
- Click Apply to write the staged changes to the model with the window still open, or Reset to roll the session back to the model's original state.
- Switch to the Link Comparison tab and choose a loaded link to compare its levels against the host, matched by name.
- Read each comparison row's status and delta, and the Monitored badge, to catch host/link level mismatches before coordination.
- Click OK to commit the session and close, or Cancel to discard every change.
Screenshots
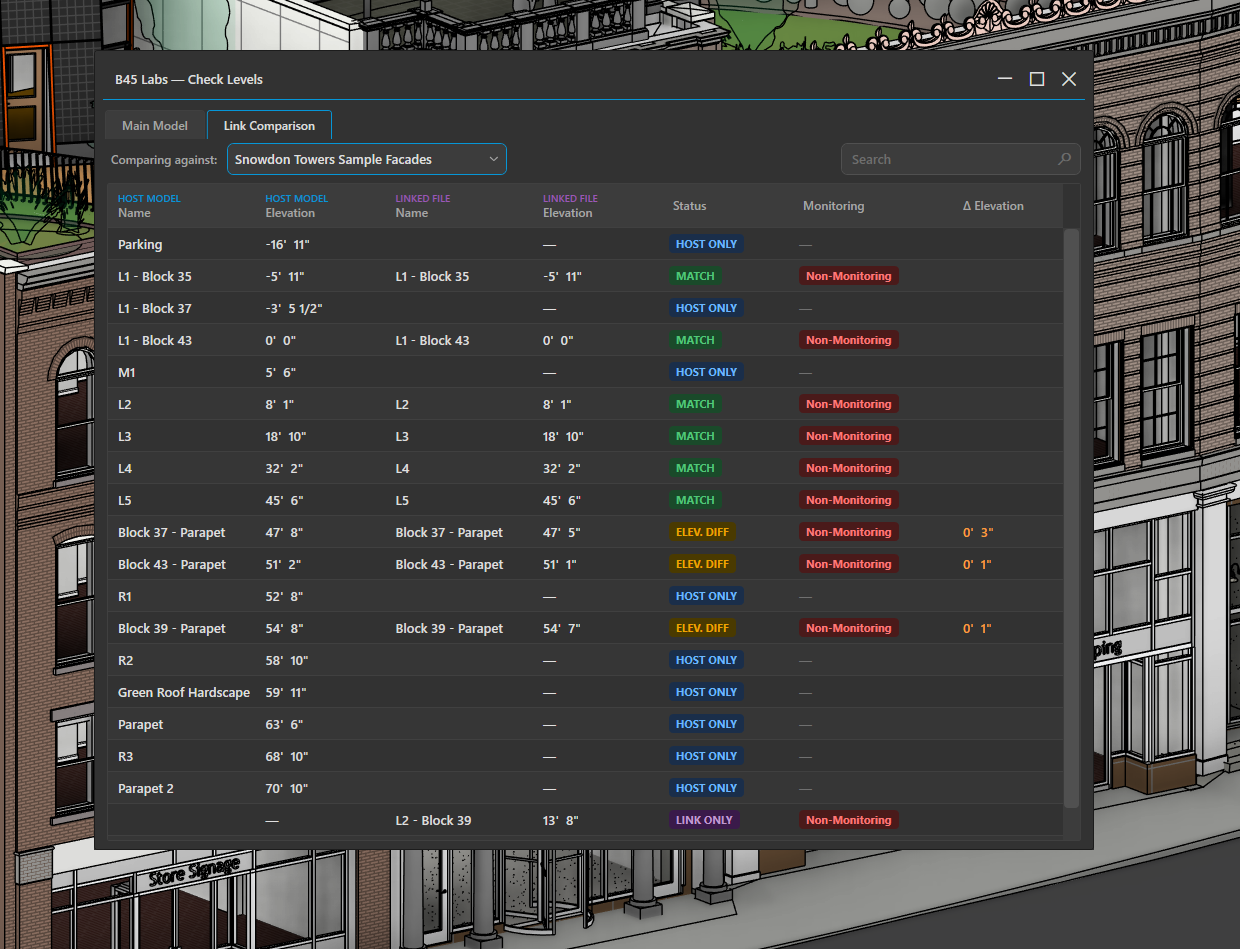
Check Levels window with editable level names and elevations
Tips & Notes
- Elevation and name fields accept the project's units; the New level offset field even accepts arithmetic (e.g. "3 * 4") and feet-inches expressions. It opens on a round number in the unit you work in: 10' on an imperial project, 3 m on a metric one.
- Type a negative offset to build downward: Add Level then places the new level below the LOWEST existing one, which is how you add a basement or a parking level without doing the arithmetic yourself. Duplicate follows the same sign, placing each copy below its source. Existing levels are never moved either way.
- The list re-sorts by elevation on each Apply, so a mistyped elevation jumps to the wrong position immediately — a fast sanity check.
- The duplicate-name and duplicate-elevation flags are the quickest pre-handoff audit; clear them before sharing the model with consultants.
- The Link Comparison tab is read-only — it's for spotting Elevation Diff / Host Only / Link Only against a consultant's model, and which levels are under Copy/Monitor.
Limitations
- The Link Comparison tab lists loaded Revit links only; unloaded links can't be compared.
- Level head visibility, extents, and 2D/3D extent mode are out of scope — Check Levels edits names and elevations, adds levels, and deletes them.